Webpack4生产环境构建相关配置 - Split CSS即分离样式

继续之前的分享【Webpack4生产环境构建相关配置 - 指定环境】
下面让我们用我们之前文章的项目来做下实践
git clone https://github.com/durban89/webpack4-react16-reactrouter-demo.git react-webpack-demo && cd react-webpack-demo
npm install
通常最好的做法是使用 ExtractTextPlugin 将 CSS 分离成单独的文件。
disable 选项可以和 --env 标记结合使用,以允许在开发中进行内联加载,推荐用于热模块替换和构建速度。
通过上面官网的描述我们知道,在生产中将样式文件单独出来是比较好的做法,下面实践下如何配置实现
npm install --save-dev extract-text-webpack-plugin@next当前时间点如果执行
npm install --save-dev extract-text-webpack-plugin
会不符合当前webpack4这个版本,所以我们安装的时候使用上一个命令来安装,如果你在安装的时候版本已经释放的话,可以安装现在这个命令来进行安装
先来修改webpack.dev.js
plugins中追加
new ExtractTextPlugin({
  filename: '[name].bundle.css',
}),
结果如下
plugins: [
  new CleanWebpackPlugin(['dist']),
  new HtmlWebpackPlugin({
    title: 'React + ReactRouter Demo',
    filename: './index.html', // 调用的文件
    template: './index.html', // 模板文件
  }),
  new webpack.DefinePlugin({
    'process.env.NODE_ENV': JSON.stringify('development'),
  }),
  new ExtractTextPlugin({
    filename: '[name].bundle.css',
  }),
],
还需要修改webpack.common.js
{
  test: /\.css$/,
  use: [
    'style-loader',
    'css-loader',
  ],
},
改为如下
{
  test: /\.css$/,
  use: ExtractTextPlugin.extract({
    fallback: 'style-loader',
    use: 'css-loader',
  }),
},
执行
npm run start
我们会看到有如下输出
Version: webpack 4.12.0
Time: 4398ms
Built at: 2018-06-13 17:55:05
         Asset       Size  Chunks             Chunk Names
 app.bundle.js   1.52 MiB     app  [emitted]  app
   0.bundle.js   10.9 KiB       0  [emitted]
   1.bundle.js     11 KiB       1  [emitted]
   2.bundle.js   10.1 KiB       2  [emitted]
app.bundle.css    0 bytes     app  [emitted]  app
  ./index.html  397 bytes          [emitted]
Entrypoint app = app.bundle.js app.bundle.css
现在app.bundle.css还没有内容,我们来加下样式
创建css/CounterComponnet.css,内容如下
.btn {
  width: 60px;
  height: 30px;
  background: #673ab7;
  font-size: 16px;
  border: none;
  border-radius: 2px;
  outline: none;
  color: #fff;
}

.btn:focus {
  background: #3d51b5;
}

.btn.first-child {
  margin-right: 5px;
}
修改src/components/CounterComponnet.jsx中的
<button onClick={this.props.doIncrement}>+</button>
<button onClick={this.props.doDecrement}>-</button>
改为
<button className="btn first-child" onClick={this.props.doIncrement}>+</button>
<button className="btn" onClick={this.props.doDecrement}>-</button>
创建css/main.css,加入如下代码
@import './CounterComponent.css';src/index.jsx添加如下引入代码
import './css/main.css';最后目录结构如下
├── LICENSE
├── README.md
├── index.html
├── package-lock.json
├── package.json
├── src
│   ├── App.jsx
│   ├── actions
│   │   ├── counter.js
│   │   └── index.js
│   ├── components
│   │   ├── AboutComponent.jsx
│   │   ├── AppComponent.jsx
│   │   ├── CounterComponent.jsx
│   │   ├── HomeComponent.jsx
│   │   ├── LoadingComponent.jsx
│   │   ├── RoleComponent.jsx
│   │   ├── TopicComponent.jsx
│   │   └── TopicsComponent.jsx
│   ├── css
│   │   ├── CounterComponent.css
│   │   └── main.css
│   ├── index.jsx
│   ├── reducers
│   │   ├── counter.js
│   │   └── index.js
│   └── routes.jsx
├── webpack.common.js
├── webpack.config.js
├── webpack.dev.js
└── webpack.prod.js
为了看出打包效果明显一点,重新启动打包程序
npm run start
看出打包的输出日志如下
Version: webpack 4.12.0
Time: 4721ms
Built at: 2018-06-13 17:53:01
         Asset       Size  Chunks             Chunk Names
 app.bundle.js   1.52 MiB     app  [emitted]  app
   0.bundle.js   10.9 KiB       0  [emitted]
   1.bundle.js     11 KiB       1  [emitted]
   2.bundle.js   10.1 KiB       2  [emitted]
app.bundle.css  233 bytes     app  [emitted]  app
  ./index.html  397 bytes          [emitted]
Entrypoint app = app.bundle.js app.bundle.css
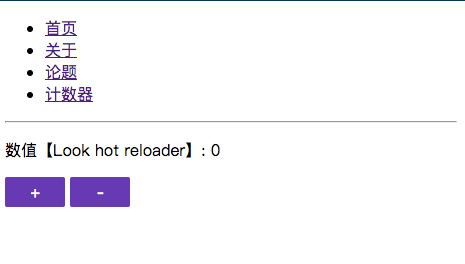
然后点击进入计数器页面
样式如下图
这里我为什么会把css单独放一个目录而且命名的方式跟组件的命名方式一样,原因是css在一个目录下比较好整合到一个css文件然后放在主入口,命名方式一样这样方便我们管理组件,这种结构化的方式会很好的提高我们的工作效率
项目地址
https://github.com/durban89/webpack4-react16-reactrouter-demo.git
tag:v_1.0.9
版权声明
由 durban创作并维护的 Gowhich博客采用创作共用保留署名-非商业-禁止演绎4.0国际许可证。
本文首发于
 博客(
https://www.gowhich.com ),版权所有,侵权必究。
本文永久链接: https://www.gowhich.com/blog/835
版权声明
由 durban创作并维护的 Gowhich博客采用创作共用保留署名-非商业-禁止演绎4.0国际许可证。
本文首发于 Gowhich博客( https://www.gowhich.com ),版权所有,侵权必究。
本文永久链接: https://www.gowhich.com/blog/835


